
Downloading
We are now using a new music file format that gives us a clearer, crisper and stronger sound. You may notice a volume difference if you are mixing music from R1-16 with music from older sets. We apologize if this causes you an inconvenience but you will see that the quality of the music playback is much better.
There are several things that you can do to minimize adjusting volume while teaching your classes. If you are using iTunes, be sure you turn on the Sound Check feature. This is meant to adjust the volume on all of your music playback to as close to the same level as possible. Here’s how to do that:
- Open iTunes.
- On the top menu bar in the top left, click on Edit, then on Preferences.
- In the dialog box that appears, click on Playback in the top menu bar.
- In the top third of the screen, put a check mark in the box next to Sound Check.
- Click OK at the bottom of the screen to save this change.
You can also adjust the volume of individual songs. Here are the steps:
- Open iTunes.
- Find the song you want to adjust. Right click on the title.
- From the menu that opens, choose Get Info.
- From the menu bar at the top choose Options.
- Look for the Volume Adjust in the center of the page. You can increase or decrease the volume of the song by moving the slider forward for more volume, back for less.
- Under the Volume Adjuster is an Equalizer. You can choose between the selections offered there to modify other parts of the music for your individual taste.
Please note that if you have used the individual volume adjust on some of your music, the Sound Check option will not work on them. It will not override the adjustments you have made. If you want Sound Check to work correctly, it may be necessary to change the volume and equalizer on any songs you have modified back to the default or None position on both items.
You will need to experiment a bit and see which options work best for your preference. Again, we apologize for this inconvenience, but hope you will hear the noticeable difference in the quality of music you are now receiving from us.
Believe it or not, that doesn’t happen a lot. Our download delivery system is incredibly reliable so about 99.9% of the time the problem is user related. We don’t mind though. We are happy to help you solve the problem! Doing customer support is actually really fun. We have sure learned a lot and made many new friends. One thing we will ask though….when you contact us, please be calm. We know you are probably very frustrated but honestly no one solves a problem very well when they are angry and frustrated right? And know that we will stay on the phone or email with you until your problem is resolved, even if we have to email you every song. Very last resort, we will refund your money if we can’t make you happy. But honestly, we rarely have to do that. Our customer service is top notch, promise! Call in the US toll free, 800-239-1881, 801-771-4411, or email customerservice@soundburstaudio.com. We will respond within 24 business hours. Maybe even on Saturday or Sunday if we can.
No worries. All downloads you purchase from us are saved in an account you create when you make your first purchase. You can access that account by going to our homepage, www.soundburstaudio.com and clicking on Login on the top menu bar. Enter the email/password combination you used to purchase from us in the Content Shelf Login area. This will take you to your Buyer Dashboard. Everything you have ever purchased from us will be shown there. You can download whatever you need again at no charge. So there is no chance of buying a download and losing it.
Importing Music Into iTunes
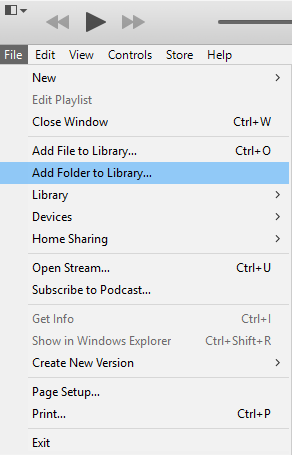
Importing music into iTunes is very simple. Once you’ve downloaded and extracted your music, open up iTunes. If you are importing a full set, go to FILE -> ADD FOLDER TO LIBRARY. If you are importing a single track, go to FILE -> ADD FILE TO LIBRARY. Then select the location of the music folder or track that you downloaded from us. Your music should now be loaded into iTunes!
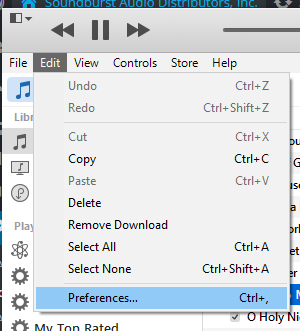
If you’ve added a folder or file to iTunes, but you can’t find it, chances are, you didn’t see the first step in our directions which you can view HERE. You need to make sure that if you’re using our downloads in iTunes, you make the following simple change in your preferences. Here’s how. Open up iTunes. Go to EDIT -> PREFERENCES.
Your preference menu will open. You need to select ADVANCED at the far right. Make sure that top three selections are checked.
- KEEP ITUNES MEDIA FOLDER ORGANIZED
- COPY FILES TO ITUNES MEDIA FOLDER WHEN ADDING TO LIBRARY
- SHARE ITUNES LIBRARY XML WITH OTHER APPLICATIONS
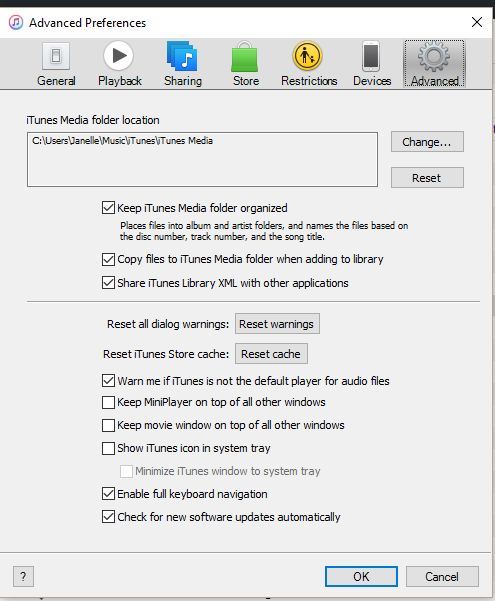
That should solve your problem!
Soundburst has made some adjustments to your music so that each track also tells you which set it is used in. To see which set it’s in, right click on the menu bar (shown in yellow) at the top of your music in iTunes. 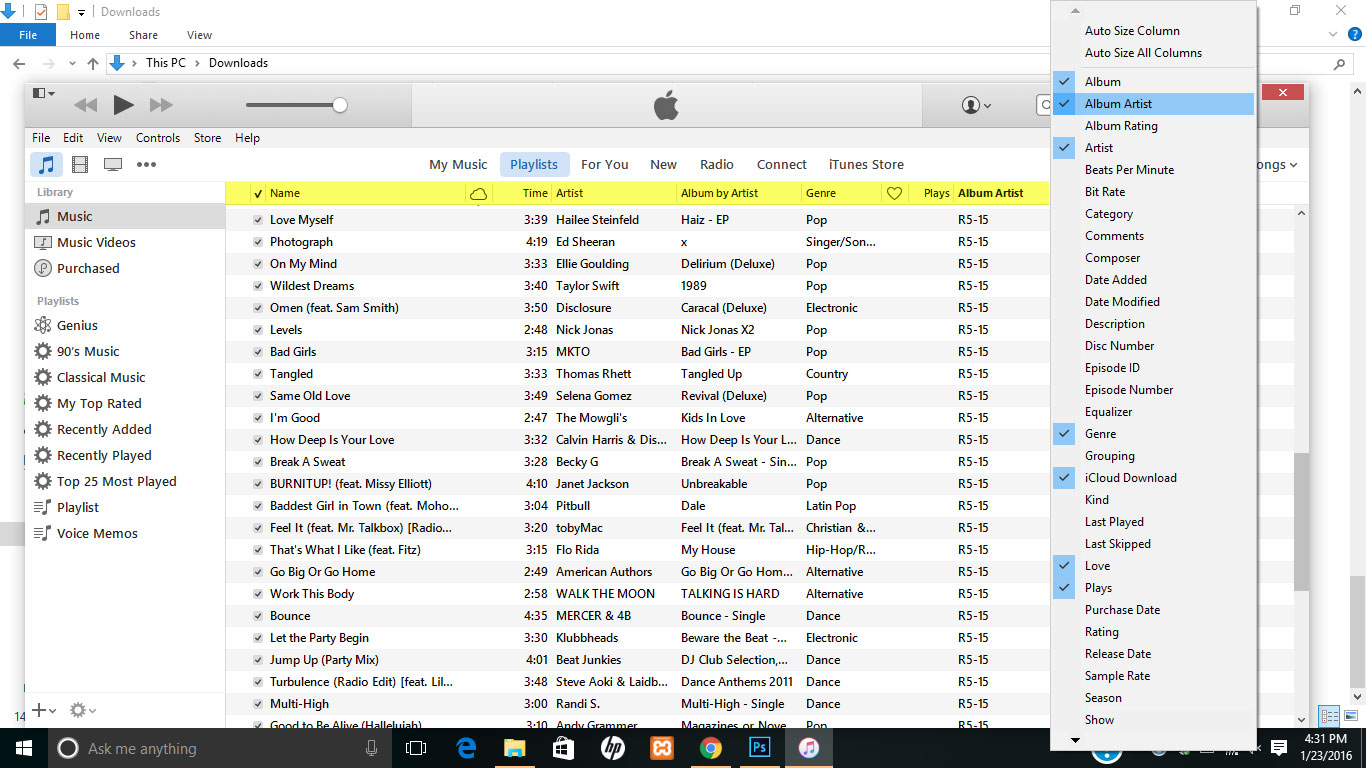
A menu opens with all of the different viewing options opens. Select ALBUM ARTIST. Your set now appears as part of your description. You can click on Album Artist to show your songs in order by set.
Music
We are now using a new music file format that gives us a clearer, crisper and stronger sound. You may notice a volume difference if you are mixing music from R1-16 with music from older sets. We apologize if this causes you an inconvenience but you will see that the quality of the music playback is much better.
There are several things that you can do to minimize adjusting volume while teaching your classes. If you are using iTunes, be sure you turn on the Sound Check feature. This is meant to adjust the volume on all of your music playback to as close to the same level as possible. Here’s how to do that:
- Open iTunes.
- On the top menu bar in the top left, click on Edit, then on Preferences.
- In the dialog box that appears, click on Playback in the top menu bar.
- In the top third of the screen, put a check mark in the box next to Sound Check.
- Click OK at the bottom of the screen to save this change.
You can also adjust the volume of individual songs. Here are the steps:
- Open iTunes.
- Find the song you want to adjust. Right click on the title.
- From the menu that opens, choose Get Info.
- From the menu bar at the top choose Options.
- Look for the Volume Adjust in the center of the page. You can increase or decrease the volume of the song by moving the slider forward for more volume, back for less.
- Under the Volume Adjuster is an Equalizer. You can choose between the selections offered there to modify other parts of the music for your individual taste.
Please note that if you have used the individual volume adjust on some of your music, the Sound Check option will not work on them. It will not override the adjustments you have made. If you want Sound Check to work correctly, it may be necessary to change the volume and equalizer on any songs you have modified back to the default or None position on both items.
You will need to experiment a bit and see which options work best for your preference. Again, we apologize for this inconvenience, but hope you will hear the noticeable difference in the quality of music you are now receiving from us.
We keep two years worth of Jazzercise’s most recent full sets in our digital shop. We also keep 4 years worth of individual routines currently dating back to R1-12. We have been a music provider for Jazzercise since 2001. Back then we were providing physical product to instructors rather than digital downloads. So in addition to two years of R-sets and four years of individual tracks from R-sets back to R1-12, we can upload lots of music from old sets. Just CONTACT US, tell us what song you are looking for and what R-set it was from. If we have it, we will upload it to our site and let you know when it’s posted. In addition to the full R-set and Individual tracks we have listed, check out the Instructor Requests already uploaded in our store. Lots of old music has already been uploaded. An easy way to find it is to use the Search Products box at the top of any page on the store. Type in the song title and if we have it loaded, it will take you right to it.
Absolutely! We started providing music for Jazzercise with the R4-01 set. Although we don’t still have access to every single song, we do have quite a bit in our archives. If you’re in need of some music for an old routine, just let us know! If we still have access and it’s not already in the INSTRUCTOR REQUESTS section of our shop, we’d be happy to add it for you. If you’d like to request a song, simply use the Contact Us form, noting INSTRUCTOR REQUEST in the subject line.
My Dashboard
All the music you ever purchase from us is saved there. You can access it again at any time. You can also view and print purchase receipts for taxes, send us an email, update your email address, billing address or password info at your convenience.
Zip Files
A zip file is a means of sending large amounts of data over the internet. It is compressed so that downloading it takes minutes rather than hours. Any browser has the means to unzip or un-compress these zip files so they can be used. Without them, downloading a music set of 30 songs could take a very long time and there would also be a much larger chance of interruption or file corruption. Zip files are a very common way to handle large amounts of data, music, documents and photos. So they are a good option for us to use to deliver a complete R-set of music via the internet.
If you are purchasing Full Sets from Soundburst, your download will be a zip file. You need to extract the file before you can access your music. Extracting your zip file is very simple. Open the folder or location where you saved your download. For example, if you use Google Chrome, your downloads are set to be in your downloads folder by default. If you use Microsoft Edge, when you clicked the black cloud to download, it brought up a dialog box that asked where you wanted to save it. I usually set the location to my desktop so it is easy to find. Where ever you saved it, navigate to that folder. Select the folder. Right click the folder and select EXTRACT ALL.
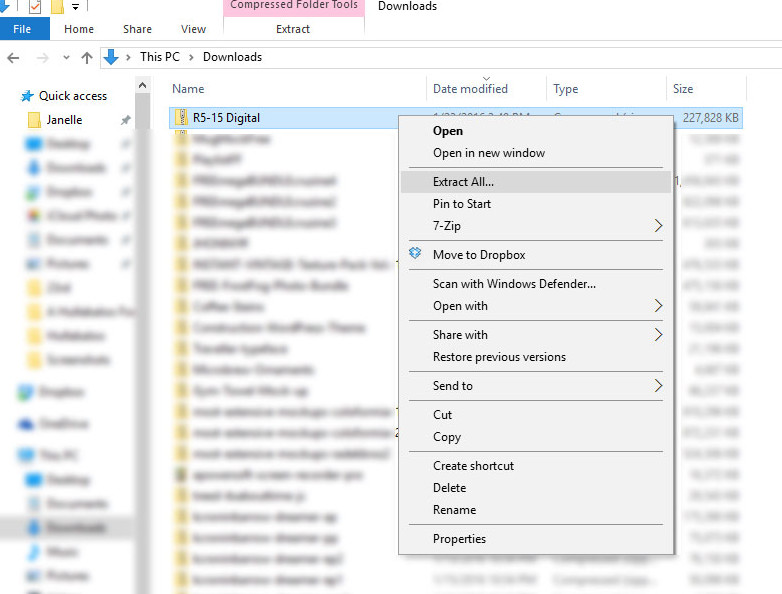
When you click EXTRACT ALL, a dialog box should appear asking where you want to save it to. I usually leave it as the default because it ends up in the same place as the original zip folder.
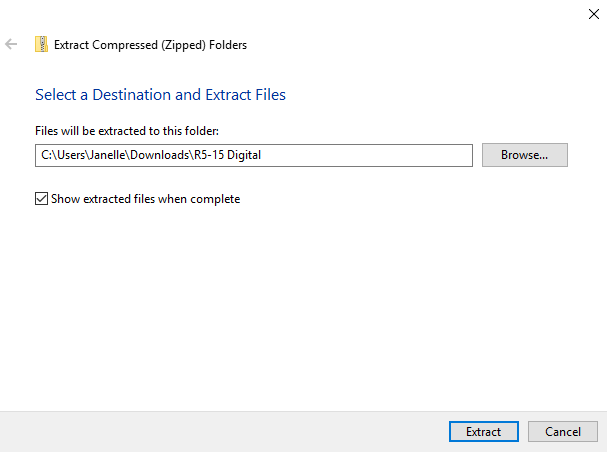
If you want your music folder to open automatically after it has been extracted, be sure to check the SHOW EXTRACTED FILES WHEN COMPLETE box. Click EXTRACT. Your music will decompress and your file is now ready to play or import into iTunes.